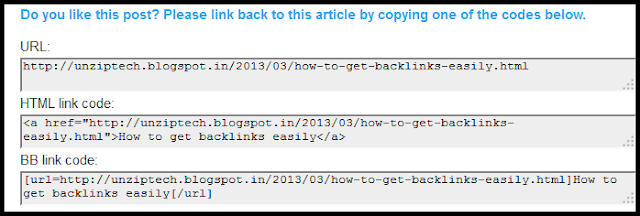
Hello Readers, continuing making your blogging experience better and sharing my experience. As I told you in my previous post about importance of getting backlinks that you should make easy for the people to link back to you. You can add a link to me widget at the end of every post by adding a simple snippet of code to your template similar to the one that is currently displayed just beneath this post. It will display textboxes that contains 3 types of links to your article at the end of your every post. It will make easy for the people to copy links from that widget so that they could give you a link back. This widget will help you getting voluntary backlinks from people who like your articles. This widget can be added in any standard blogger template you need not to have a custom template for this.
If you still do not know the importance of back links and
how to get them I will recommend you to read my post about those talks about how to get backlinks easily.
Like Wordpress, Blogger does not have pre-defined widgets so
you may find it a little difficult to customize your template, but if you know
a little HTML/XML it will be very easy for you.
Now I will take you through the steps that you need to follow to add this widget:
Now I will take you through the steps that you need to follow to add this widget:
1) First you should take the backup of the current template to
avoid any loss. To take the backup you need to login to your account, then go
to Layout > Edit HTML and then click on backup.
2) Now check on the “expand template” checkbox, and find the following lines of code:
2) Now check on the “expand template” checkbox, and find the following lines of code:
<data:post.body/>
If this code resides there more than once, you need to find
out the second one.
3)Now add this snippet of code just under these lines, do not
modify this code, it may stop working.
<b:if cond='data:blog.pageType == "item"'>
<p style='color: #32A0EE;font-weight: bold;'>Do you like this post? Please link back to this article by copying one of the codes below.</p>
URL:
<textarea id="url" onclick="this.focus();this.select()" readonly="readonly" rows="2" style="background:#eee; height: 2.6em; width: 100%;" title="Click to highlight"><data:post.url/></textarea>
HTML link code:
<textarea id="HTML-code" onclick="this.focus();this.select()" readonly="readonly" rows="2" style="background:#eee; height: 2.6em; width: 100%;" title="Click to highlight"><a href="<data:post.url/>"><data:post.title/></a></textarea>
BB link code:
<textarea id="BB-code" onclick="this.focus();this.select()" readonly="readonly" rows="2" style="background:#eee; height: 2.6em; width: 100%;" title="Click to highlight">[url=<data:post.url/>]<data:post.title/>[/url]</textarea>
<span style="color:#333; font-size:10px;float:right;">Widget by: <a href="http://unziptech.blogspot.com/" style="color:#333; font-weight:bold">Unziptech Blog</a></span>
</b:if>
4) Click on the preview button to make sure the widget is added successfully and you donot have any error in your template. This widget will show only on the Full post page.
5) After this, click on save button to make these changes
permanent.
You just added a link to me widget in your template, if you have any problem adding this widget comment here, I will be glad to help you. In case you are wondering how to add an affiliate banner to blogger header you may read my post about the same, it has all the instructions to do so.
If you like my work; you can show your regards by hitting Facebook like button, following us on Google+, stumbling our posts on stumble upon or giving us a link back via the links below. Stay tuned for more updates.
Do you like this post? Please link back to this article by copying one of the codes below.
URL: HTML link code: BB link code:


No comments:
Post a Comment